
I've started this page Feb 7, 2016 as a central hub, to record comprehensive details and the build history of my Jeep. Previously I had been maintaining this information on a forum but wanted something to share with non-members. I am migrating this data over here so dates may seem weird. I will try maintain accurate incremental updates going forward.
The Beginning (dates of original posts excluded until they become more relevant)
Found the Jeep in August 2013.

Bringing it home.

First modification (kinda), had the decals on order before I owned the Jeep. Yes, this is the primary forum that I am part of.

The first time off roading, just a quick trip up to an old train trestle.

I brought the Jeep home on a Saturday, parked it overnight with a Sunday morning Out of Province inspection booked at Canadian tire.
Took it in and passed with flying colors the guy doing the inspections said it was in exceptional shape for the age and only little thing was one of the rear shocks had started to leak, however advised it might still be good for a couple years. I tried to get insurance on it that day right after but for some reason ICBCs computers were not allowing one of the checks to be done so I would have to come back later in the afternoon. I was allowed to drive the Jeep back home. As I was leaving to go try again for insurance I walked past the jeep and noticed it was leaking out of the front passenger axle seal.

So I topped up the fluid ever couple days and took it to my parents place where I made my first repair

Lordco gave me the wrong part and their questions about the part I needed didn't instill much confidence in the first place, I suggest you go to the dealer for this one. I went to Kelowna Chrysler first and they were asking $27ish for the part (reason I tried my luck at Lordco) but when I went in in Nelson without dickering they gave it to me for $17 so I was happy.
While visiting my parents I also decided to scrape off the flaking paint on the door hinges and paint them with bedliner.
While visiting my parents I also decided to scrape off the flaking paint on the door hinges and paint them with bedliner.

I also used a Plasi-Dip like product on the windshield corners as they had rock chips and I thought this added a little protection while helping to customize the look.

Also while on the trip to my parents I found a set of Rubicon wheels and tires back in Kelowna. I had my brother pick them up so they were waiting for me when I got home.

Once I was back in Kelowna I started exploring some of the local back roads. Here is one from up Terrace Mountain.

I also started going out wheeling with other BCJC members, here are some from my first time out.


The drive with other club members was the first time I had ever aired down. It was great how much smoother it made the jeep ride on the rough roads. Plus it increases traction, although I am not sure it was necessary that day. After that drive I had to make it home at about 20psi. I decided that On-Board Air (OBA) would be my first 'performance' modification.

With the on board air I needed a place to mount switches so I ordered some project boxes and made this, it isn't as sleek as an spod, but works well. Since then I have further modified it with 2 Lee Valley spring pencil holders, have run power out of it for a dash cam, as well as use it to store a headlamp. I hope that if you are reading this, you will appreciate some of the minor mods and 'tweeks' to existing parts.
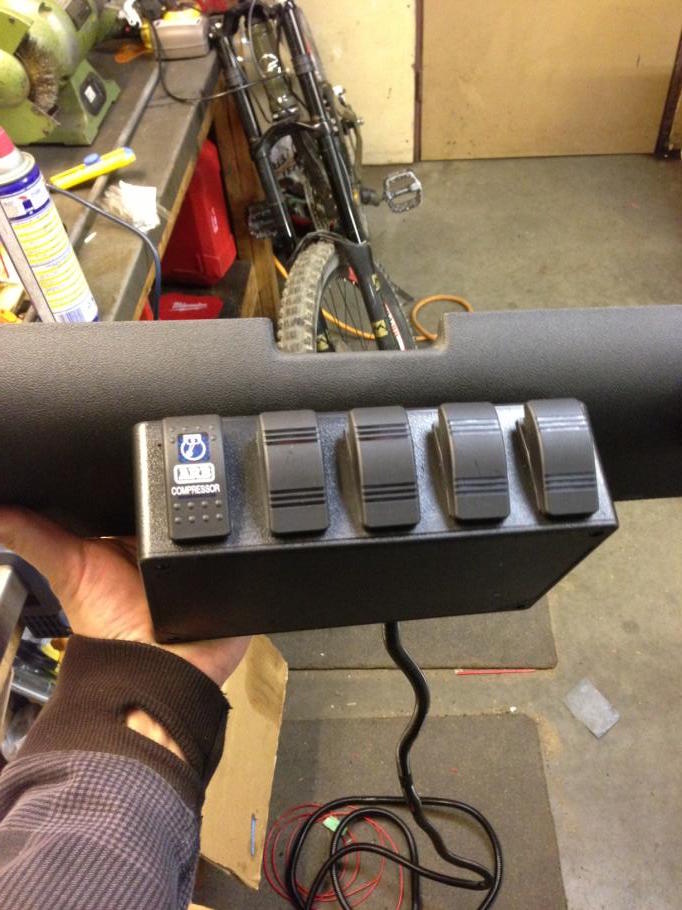
The ARB compressor comes with a nice harness, and I created another wiring loom for all the other wires so I didn't have to pull it apart each time I needed to add an accessory. (ARB runs down driver side pillar, the rest run down the passenger) I also ran two powers, one that is switched with the ignition and the other that is always on.

Around this time I got inspired by a jeep online to Plasti-Dip my slightly rock chipped grill grey.

Next up I wanted to do something that allowed me to carry my Kayak. It was kind of sad that I had this Jeep, but if I wanted to go mountain biking or kayaking I had to take my little lowered VW GTI.
I bought this Kargo Master Congo rack through a friends dad at OK Hitch. It was an evening build/install but I did need my brother to help me get the assembled rack onto the jeep. I highly recommend more than 2 people for the final install actually, I was quite tough doing this without scratching the paint.

The reason I chose this rack as it is completely bolt on, can tip back for hardtop removal as well as soft top being raised up and down, plus can be taken off just leaving the mounts for a long road trip if not needed.
I am not too keen on how it actually looks so I wanted to add some lights to the front to fill the gap between the rack and the roof line. Found these on a local classified, and welded a bar that fits across the rack. (They are 4 8" KC lights, 2 driving 130w and 2 long range)


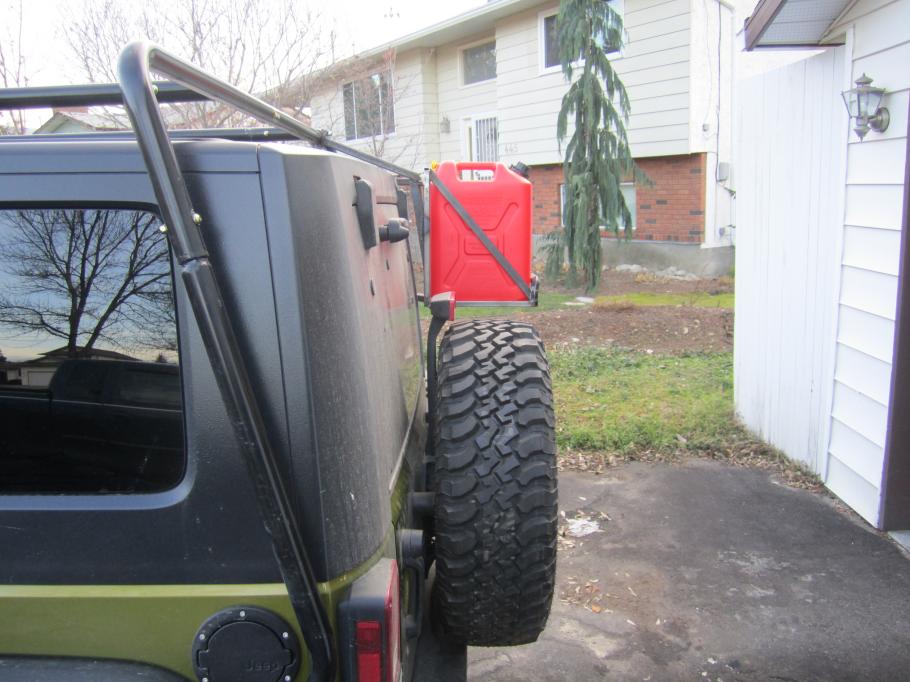
I also welded a Jerry can holder that can be installed easily for longer trips. I am able to hang my 200lbs self of the end with no noticeable flex.

Saw some cool paracord handles and wanted to make a set, found a good youtube instructional (https://www.youtube.com/watch?v=ywU9qKaK0R0) that was easy to follow. They cost a lot less that the other handles on the market and you have the freedom to customize the colors, lengths, how the mount etc.

I made these, as well as ones for the rear that mount into the sound bar, and another set that mount to the head rests. (After the original post I also 'remade' these to have two sets of handles, one from the a-pillar to the sport bar as in the picture, then another handle just on the sport bar, that would function as most of the velcro on after market ones do.)
Saw a post on the BCJC Forum about some Rubicon take off suspension, however the guy didn't have the Jeep yet, I sent a PM and sure enough a few weeks later the Jeep was purchased and he contacted me again to see if I was still interested. I bought them on a Thursday and they were here Friday, I stayed up until 2am installing the springs and shocks. It was a fairly easy job, but I needed to use a spring compressor for the rear springs. Next time I will disconnect more, like the swaybar and trackbar to see if I could get the axle to droop a little further.


![[cheers]](https://lh3.googleusercontent.com/blogger_img_proxy/AEn0k_tr1Km7jy1UjzYchkR79-wfeG2CM-7m-oVhm1mFwSE4JwebDI_ivI1j3ioSxk1w_fZYwmG9k_BKds4gL5hIYzydYZNpKGaR5UB2EveF_avwuFoPQJxs=s0-d)
I've also heard people talk about this as an 'upgrade' to their Jeep. My suggestion is if you find yourself in a scenario like me with a good deal on nearly new suspension to replace a worn out one then do it. If you still have springs and shocks in fairly good condition, skip this an go for an aftermarket system.

I forgot to mention previously, that I had also purchased the Daystar upper dash panel that adds a couple extra places for storage. I suggest to plasti-dip this piece as it prevents items from sliding around so much.

After doing the new rubicon suspension I still had the rake in the jeep (maybe even more so with the stiffer rear springs) so I ordered a set of 1" Taraflex front spring spacers. I took measurements before and after just the springs and shocks. These were the measurements to the bottom of the fenders from floor. Note I also ran my Jeep for a few days before measuring, any suspension will settle in a bit. I feel measuring right after an install is the main reason some people claim 'lift' from the JK parts.
Before: Front 34 3/8 , Rear ~35
After: Front 35 3\16, Rear 35.5
The spacer, as you can expect, adds exactly an inch on the front.
This past weekend I also added rock lights to the front following the suggestions found at the address below.
http://project-jk.com/jeep-jk-write-ups/walmart-platinum-burner-rock-lights-installation-write-up-review
I noticed Princess Auto had a bunch of the Platinum Burner lights for $19.99 a set, the next time I had gone in however they had been reduced to 12.99 so I picked up a couple sets. Took about an hour since the switch was already installed.


March 9, 2014
Wanted to work on the Jeep today but wasn't sure what to do. I decided to modify the Daystar Dash panel with a Ram mount ball that I had laying around. I was having issues before with the suction cup sticking, I think due to heating and cooling cycles of the windshield.


Since the pictures I have further modified this to have a mount on either side of the panel sticking out each side to not block defrost. I've also added a 'fin' on the back to help direct additional air to the drivers side. More than anything the lack of effective defrost is my biggest frustration with the Jeep. I think this issue was corrected in 2011 with the interior redesign.
I also had some extra waterproof LED's that I had ordered to use as rock lights, I decided to put them under the hood. They aren't the brightest of all LEDs but they work surprisingly well (pictures don't do it justice), I don't know why more people haven't done this (I've never seen it on a JK).


To turn them on I will just be putting an alligator clip to the battery on the positive wire.
March 12, 2014
Up next was a set of disconnects. I read somewhere that the increased traction was very comparable between, airing down, disconnecting, and lockers. For my needs this was a logical progression, especially considering I was aiming for an overland style build, and lockers were way out of my price range. I am also the type of person to go for performance even if it doesn't make my Jeep look tougher.


If you are considering these, keep in mind that they do require frequent maintenance several times a year to keep them greased. *They seem to be holding up well now that I have almost 2 years on them.*
March 23, 2014
Well I have tried out the disconnects, fairly impressed, easy to take them off and put back on. I wish they provided directions on securing the swaybar, I had tried cheep zap straps and some other reusable connector. Both of these systems broke and allowed the bar to fall against the axle. While on the trail I was able to secure it with some tie downs used for my kayak, so might look for something similar.
Last week I also built a cart for moving/storing my hardtop. I was in a hurry so I didn't get great pictures.


This weekend I decided to wire up the second set of Platinum Burner lights that I had picked up to use as rock lights. I wanted to set them up kinda like backup lights.
After crawling around underneath the Jeep I decided on mounting them to the rear swaybar bolts, I had to build some brackets to lower the lights but they still end up in being in a position that should be safe from most hazards. They also face outwards 30 degrees, hopefully this will help when steering around obstacles in reverse.

Here is another picture. I wired them into the same circuit as the front rock lights. These are quite nice to have when airing up in the dark.

July 20, 2014
Well Its been some time since I updated... I haven't done anything drastic but have made a few more minor changes/tweaks.
First off, with the roof rack they had designed it to be tipped back for removing the hard top or using the soft top. This required two large bolts be inserted and removed in the from A pillar arms. Doing this a couple times I notices that the steel at the bottom with tapped treads was being stripped out. I wanted a way to prevent this from happening as well as an easier way to use my softtop.
My solution was to use stainless ready rod, permanent Loctite, 3/16" locking pins (same as on discos).

You can see here that I designed them to fit just when the nut was finger tight, I now use a washer and wrench to tighten the connection and reduce movement/vibrations. The reason for this is I hit a series of potholes and the light bar I had smashed the corner of the windshield. (Don't worry it was already chipped and cracked) Overall this mod has been great! It is MUCH quicker and easier to tip the rack back, as well as isn't going to strip the treads. The prop rod also needed to be modified. If you are considering this rack, I would do this modification from day 1.
I purchased a second hand set of soft doors, I have since sold them. There were a number of reasons I sold them, the main being I want to go a more overland vehicle route with my Jeep so needed something I could lock as well as it was a lot of money for me to have tied up in something that was technically illegal and only usable a fraction of the time. In addition to that, the one time I did use them during a group run it was very dusty. I was able to flip them and come out ahead. The one thing great about them is they finally got me to take off the stock doors which was a HUGE PITA. I ended up having to unbolt the doors from the Jeep and hammer at the hinges for ~3 hours... and yes I had been spraying penetration lube (kroil and Pb blaster) at them periodically for the past year. Now that they are cleaned up and lubed it takes less that 5min to remove.

My next mod goes back to earlier in the tread with the JKS disconnects. I tried everything to hold the sway bar in place parallel with the frame, however nothing seemed to be that great. 175lb zap straps would snap in minutes, ther reusabel straps were even worse, the best thing I had found was cammed straps that I use for the kayak however even cheap straps like this would only last an outing or two. The better quality ones I had were much better only starting to show signs of wear after 10 or so uses. Regardless, I wanted a better solution.
Here is what I came up with I fabricated a bracket that bolts to the steering box bolts, and has a pin on it, Then a piece of flat bar bent to a shape that would allow the swaybar be held in neutral position. I was just eyeballing the dimensions of the mount and lucked out because the nut on the back of the swaybar passes between my mount and the spring seat. Something to take into account if you try something like this. I also place a piece of hose over the top mount to deaden vibrations. This system has worked great so far, easy to install as you can release driver side disconnect, place this on reusing the same pins, and finally disconnect passenger.

In the process of fabricating this the 3/4" hole in the flat bar became out of round when I made the bend, so I stupidly tried to hold it and use a step drill to clean it up (as I stood overtop the vise I should have been using...). The metal bound it the drill, ripped out of my hand and jammed itself between (well in) my finger and the cordless drill handle.

Had to reassemble the Jeep before driving myself to the hospital.
After I had the light bar on rack smash my window I decided it was time to upgrade to LEDs (even though I think now if I just had the rack on the A pillar tighter it wouldn't be an issue). I searched eBay and found one similar to what a few friends had bought, and place the order. About two minutes later on the local classifieds I found another for sale at the same price. I wanted it next day so I was able to buy the used one locally and in the end flip the eBay one at a profit. Also picked up some amber covers (in addition to the black ones it came with).

Light output isn't quite as great as the previous lights, but considering it uses about 1/4 the energy its good enough for now (until I also get a 50 inch. haha)
Around this time I also got some new tires, as I wanted something a little larger and a little wider. Plus be able to sell the rubicon take-offs while they still had value. I ended up going with the least expensive option, the newish Atturo, Trail Blade MT. I'm not super keen on the sidewall pattern but they cost so much less than anything else I had to give them a try. Would have been nice at this time to go to a 35" but with the 3.8 and 3.21 gears it just would have been dumb. So far, the tires have been great! (Feb 2016 update, although I am running winters right now I still must say these have been great tires for the price!)

I ended up trading the Rubi takeoffs for a Daystar Cam Can set. Came with brand new storage can, as well as the green miscellaneous (no fuel) liquid can. As well as both a one and 2 can center rod. Currently just running the single storage can until I figure out what non-fuel liquid I should be carrying. (suggestions? don't say water)

After this I found a really good deal on a nearly new condition set of 08 Rubicon sliders. I had already taken off my steps to clean them up but had broken the back bolt off on the passenger side. After trying to extract it I ended up having to just tap it out.
With the sliders I knew my short friends needed something to step on, I fabricated a set of bars that would run the length. I kept the design really simple and I feel it ties the front and rear together well. Before building these I hadn't realized how much the front end of the Jeep tapered in.


I have also bought a Hypertech programmer off another Jeep club member. I 'think' I noticed a little power gain and initially better fuel economy. I will update when I have had a chance to crunch some numbers, however it will be tough as I only had two tanks of gas (one only highway and the other mostly highway with a little offroad) between the tires and programmer.
Aug 16, 2014
Here is a post about the gear I carry and my organization that I hope inspires some of you JK owners out there.
The images are just what I have under the rear seat. Im going to go through the items working from the passenger side to the drivers side.
Here is an image of the "tidy" back area. Notice all you can see is just the fronts of 2 of the storage containers. Still nearly all of the available leg room for your passengers. I made a couple trips to the store to purchase/return various different bins to try find the ones that fit the best. Would have been nice to have all 3 matching however the supports for the seats are all different so I have 2 different styles. I also keep the 2 that you can see secured under the seats using a simple strap where one length lays over the lids and the other holds the bins back.

First up is kind of a junk drawer/survival bin. Here is a picture of what it contains.
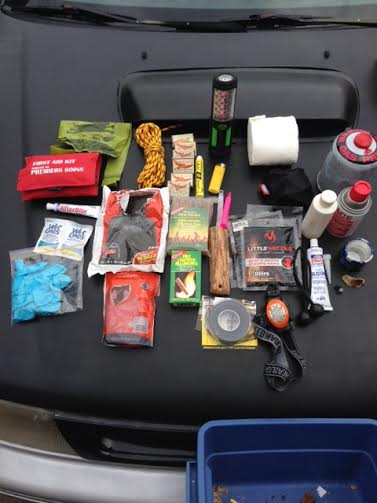
Mainly in this box I would like to point out the following:
- First aid kit and extra Nitrile gloves
- Small stoves, one small compressed gas Primus one with fuel, another alcohol stove my dad made out of an aluminum beer bottle, normally I have a slightly larger one from an aluminum water bottle that I will have to find. Plus Methyl hydrate for the stove(s)
- Fire starter and matches. I'm not hardcore into bushcrafting so I will embrace the modern conveniences when it comes to getting a fire going.
- Hot Packs, nice to have if the weather is ever colder than anticipated.
- Garbage bags, and dog waste bags.
- LED headlamp and worklight, although not high quality, both have come in useful many times.
- Ether, originally put it in to reset a bead, however I don't think I would ever use it for that (ratchet strap instead). Still works great for getting a fire going.
- Random Rope, had a few lengths laying around so I tossed one in.
- Self healing tape, doesn't have adhesive but when you remove the backing and stretch it back onto itself it has a very strong bond. Can be used for fixing hoses etc.
Next, between the passenger bin and middle bin I have my bear spray.

After reading a post on on a forum where a guy had attached an ammo can to the outside of his rig I figured it was a good idea to figure out something other than having my bear spray rattle around under the driver seat. My dad told me about the idea of making one from plastic pipe, and doing some research it looks like this system is sometimes used by pilots.
Next up, we have to some food/snacks.

Don't have it stocked up right now, but I like to keep a few snacks for trail runs or random stops. Any suggestions on inexpensive "just add water" style meals? Dollarama used to have great rice packets that came with seasoning and a spoon for about $1, they tasted awesome as well, however I haven't seen them in a while.
Also you might notice the two squeeze bottles, this is Dr. Bronner's soap. Its all natural and has so many uses. I encourage you to google its uses and check out its website. https://www.drbronner.com/ I personally like using it for shaving.
Here we have the cooking gear and paper towel.

Nothing that special, but they work great! They were a Christmas gift from my brother. Around the house I don't use non-stick but camping or in the bush it makes cleanup so much easier.
Lastly we have the "off roading" kit. This sits on the drivers side and slides out like a drawer towards the door.

This carries the the ARB deflator and air hose. Also have some gloves, as well as the bracket I fabricated to easily ensure there is no movement in the swaybar when disconnected.
All in all I'm surprised just how much can be stored under the rear seats!
In the back under floor storage area, I have:
- Selection of tools (multi bit screwdriver, socket set, allen keys ...)
- 30000lb rated recovery strap, just a cheap one that has no stretch. Need to get a better one, but even still this has pulled a few jeeps out of snowbanks, including myself.
- Breaker bar and deep socket for the wheels, last thing I wanted was to have to fight with a seized bolt when I have a flat. Don't know what a stock jeep comes with (mine didn't come with a jack or tools) but this is probably nicer.
- Folding saw my dad gave me. Old and doesn't look like anything special, but cuts really well.
- Various sizes of zap straps, for just in case.
- A spare serpentine belt, replaced mine even though the old one looked in great condition, so kept it here just in case.
- Bottle jack, as mentioned above my Jeep didn't come with the factory jack so I found a bottle jack that fits in the same spot nicely. Just have to remember the correct sequence of pull, turn, lift, tilt, etc. I think its rated for 4 tonnes.

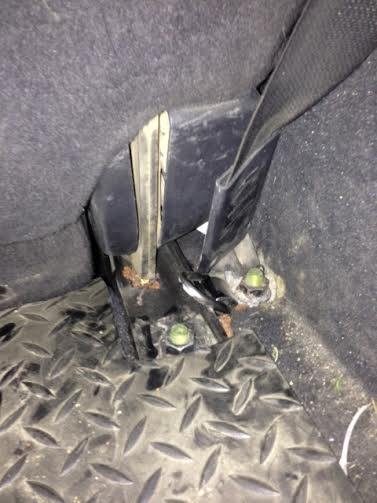
I also have fabricated a couple tie down points that attach to the rear seat belt mounts. They are not that necessary but can be flipped down and sit lower than the stud. Still planning where to add some tie down points to the rear of the cargo area.


Finally, I also have just a couple short D handled shovels, and a cheap axe and hatchet from Princess Auto. All of which I just tuck up right behind the seat. I carry real shovels because I've been stuck once in snow with someone else and had to dig out with a folding survival/military shovel like many Jeepers carry. It worked, but this would have been way easier.
Any suggestions for added equipment? (still need a fire extinguisher, but what else?)
Since the last real update I also got this, something any Jeeper should have. A more fuel efficient vehicle.

My parents old Honda Accord, looking at the milage they were getting it was right around 40mpg so significantly better than the Jeep. Also saves wear and tear on an already high milage vehicle while going to and from work or running errands. Also a little more peppy when driving around town or trying to pass someone on the highway (never thought I would ever say that about this car, especially compared to the V6 GTI I used to have).
October 22, 2014
A while back in September I also made a trip to the Kootenays for Lavina lookout (Big thanks to those Four Wheel Drive Association of BC members who helped out on this project, it's great!) while there I also went up Meadow mountain. Upon returning to Kelowna I hadn't used my Jeep much, just moved it in and out of the shop a couple times. After one of these moves I noticed some brake pad material laying on the road in front of my driveway. I checked and it had come off the rear brakes.
After replacing the pads I decided it was time to rotate the tires, I jacked up the front of the Jeep and noticed that the driver side tire shifted slightly. Looking into this the wheel bearing was shot, at the outside of the tire I would say there was about a quarter inch of play. Replaced the wheel bearing and front brake pads while I was at it. Luckily I caught this before heading to Whipsaw.
There was another post up on the forum with someone installing heated seats, this is something I had wanted to do since I bought the Jeep but I though that it was going to be way too hard to take the upholstery off the seats, turns out that luckily this isn't required. Here are some pictures of the install.
First step was pulling the doors off and the seats out, this helped with the install of the switches and takes less than 10 minutes.

Here is the kit, came with two heating pads one for the seat bottom and another for the back, as well as a full wiring harness and some reflective adhesive strips.

Once the seats are out you will need a 15mm socket for your impact (which I didn't have and so this took 10 times more work than it should have...) to take the two halves of the seat apart.
Then disconnect the closures and open the cavity between the fabric and foam.
Slide the heating pad in and ensure the connectors are located closer to the inside once the seats are reinstalled.

I then wired the switches towards the rear of the console, I though the switches may stay cleaner and out of harms way in this location, time will tell.

I pulled the power from the left hand side power outlet that is switched. This is the same location that the Mopar kit uses. There are 2 10 amp fuses (one for each seat) that are hidden behind the panel below the outlets.
This has been one of my best modifications as they are inexpensive and add a lot to the driving experience.
No comments:
Post a Comment