Ever since I have gotten my Jeep I had been doing modifications which I felt were priority for the performance of the Jeep and its offroad capabilities while remaining in my budget. As you have seen in the initial build writeup are things like, the ARB compressor, JKS sway bar disconnects, and Rubicon takeoff suspension have taken priority over parts that 'look cool'.
Now there is no doubt that I would love a big lift, massive tires, aftermarket bumpers, winch etc. however none of that stuff has really been necessary. I have gotten through tough trails while still maintaining a vehicle comfortable to drive on the road. To me this is how all parts should be purchased, by asking yourself do I need it? Do I want it? For the cost, what does it give me?
Since I had been hammering out these highest ratio cost/benefit modifications for the last 3 years it was slowly creeping up on the inevitable... a re-gear.
Now I have made up in my mind that my Jeep must have lived a pretty easy life before me. From all I can tell it was a one owner (leased, then bought out), woman driver in the flatlands of Calgary AB. When I bought it had stock tires (Goodyear SR-A), only a few minor scratches that were not buffed out (all but one were from a dog jumping up on the door). The Jeep was also spotlessly clean inside and out including a frame and suspension that looked brand new.
From this previous easy life its easy to understand how the original owner (and many others) have had their jeep for so many years with the 3.21 gears. In fact when I bought it I would easily have been able to get 600-800kms per tank of gas. However now as time has gone on, and I use it off road as much of the time as on, run larger more aggressive tires, use it to pull my trailer, or at the very least packed full of camping gear I have found that I have been unable to use 5th and 6th gear. In fact even over this last summer I had paid attention to how much I used these gears and I would estimate 5th was used about 1-2% of the time, and 6th was well less than 1%. So when some investments paid out I knew I had to make a big decision. Stay with this Jeep and re-gear, or trade to something else.
I stuck with this Jeep for several reasons:
1. I only paid $14,500 for it so wasn't too worried about negatively affecting value in terms of investment with any future modifications. (All Jeep modifications have to be thought of as getting pennies back on the dollar in a resale situation, if not impacting the value of the vehicle negatively)
2. I felt I know all its quirks, and yes parts will go bad and things will need to be replaced, but once they are I know that they should be good for many years. Recently I had done a lot of work on the brakes, suspension, U-joints, ball joints, wheel bearings, fluid flushes, oil changes etc.
3. Cosmetically it was as nice as I could expect or really want. I wouldn't want anything too perfect that I would be afraid to pinstripe.
4. Desire to modify no matter what. Regardless of what platform I have, I will want to modify it. The Jeep has plenty of capability out of the box and huge aftermarket support. The holy grail of modifications being a motor swap to either a V8 or Diesel, both of which have a lot of support in this platform.
So now that the decision was made to embrace this Jeep I knew I was going to have it professionally re-geared. I normally like doing things myself but my better judgement and lots of research showed that a reputable shop is the only way to go. For this I took it to Kelowna Transmissions, the owner is an avid Jeeper as is most of the staff, and finally their online reviews indicated exceptional service.
I originally was leaning toward 4.88 gears as my calculations put it so my new 6th gear would have been similar to 4th prior, exactly where I was driving most of the time. However speaking with the owner of the shop while out wheeling one day he suggested no more than 4.56 due to the limited teeth engaged with these higher ratios. I settled on 4.56 since the cost between ratios was negligible and a 4.10 was too pedestrian. Especially if some came from the factory like this.
I also spoke to the shop at length regarding different locker options and ultimately decided that they were just not in the budget at this point. If I was to add one in later I would already have the gear set, and the pinion would be set too so labor would be less expensive. I did opt for a rear limited slip as it only cost an additional 100 over the open carrier and since it was a factory option I figured that there was some benefit over not having one. Plus I figured that the resale of the carrier would be better should I ever go to a selectable locker.
Once all was decided the parts were ordered and the Jeep went in the shop that same Friday. I had to go through a weekend withdrawal from it but got it back on Wednesday of the next week. The cost was quite a bit, and truthfully more then I originally wanted or expected to pay, but when I priced it all out on my own for the same quality components it was right in the right range.
Driving the Jeep for the first time afterwards was a bit of an experience, first of all some people say it drives like a different vehicle. To this I say yes and no. Yes it will feel different, to me it felt lighter. It was easier to get moving at stop lights but you do have to shift a heck of a lot more around town. I noticed several times being one or two cars back in an intersection and having to shift once before the intersection, then again midway through, you would be in third gear by the other side. This attribute may also negatively impact your 0-60 time, unless you are fully loaded since so much time is spent shifting. However I say it doesn't make it feel like a different vehicle because you still ultimately have the same HP from the engine, if you are pulling up a steep hill you will still need to rev out the engine to get the power to the wheels, you just may now be in fourth instead of 2nd and have more flexibility to shift down or up depending on the slight variances. Regardless the overall driving experience is greatly improved!
Towards the end of breaking in the gears I actually took the jeep on a 750km day trip to pickup the ARB bumper written about in the adjacent post. On the freeway the drive was also much nicer and relaxed as you could use 6th mostly, and 5th when needing to pull the mountain pass hills.
The re-gear really shines off-road all the gears feel peppier, and there is a perfect gear for everything. Previously I also found myself using 4low anytime the road turned into a trail or a cross ditched needed to be crossed. With the new gears my experience off road has been that 4 low was only needed for about 1/4 of where it was need before.
I can't wait to spend more time off road, and this season in the snow!
PS. If anyone out there has the 3.73 and up gears but finds that their jeep just has too much power I have a full set of 3.21 gears I can sell you at a great price.
A place for me to document vehicle builds, mods, gear reviews, and trips.
Sunday 27 November 2016
ARB Bumper Install
Ever since I was a kid, I have always liked the look of ARB bumpers on vehicles. There is something about their design that is a balance between ruggedness and a clean design following queues of the vehicle they are to be fit on. So when it came time for me to choose a bumper for the Jeep I looked at all options but kept finding myself returning to the ARB as my favorite design. Like many other bumpers it also has the provisions for a winch to be mounted with no additional brackets.
For those that found this write up and maybe only care about the aesthetics of this bumper I have put some before and after shots from both the front and side of the Jeep.
 |  |
 |  |
Please note that the perspective on each of the images above is slightly off, it would have been best if I had a camera set to the same zoom in the same location to do both a before and after since the jeep did not move during this time. Also I had meant to do before and after height measurements since this bumper is considerably heavier than stock (~5x heavier).
Design aspects to note:
- I like the way the wings of the new bumper taper up to the sides allowing for an increased tire exposure for larger obstacles
- Bumper mounted up higher so even though it has a higher frontal area, it does not affect approach angle too much. Note where bumper sits with reference to the marker lights in grill.
- Side wings have marker lights which do two things, one is add additional visibility to the vehicle when making a turn, and the other is breaks up the amount of black 'mass' there is the bumper.
- Also the bumper makes room for larger tires in the wheel well, however I suspect this would only ever be an issue with 37" or so. Nothing I plan to benefit from.
- The fit of the bumper to the fenders. Notice how nicely the bumper fits up against the fenders, closing the massive gap that the factory one had, I bet I will be throwing less rocks into my own path.
- Fog lights mounted outboard. While I love the look of the placement of the factory fog lights in the stock bumper, having them mounted outboard seems to improve their effectiveness slightly.
- Airbag compatibility, while I dont think most people would give this a second thought, I wanted something that helps maintain, or enhance the factory engineered safety features of the jeep. Behind the two plastic pieces on the front of this bumper are the original factory crush cans removed from the stock bumper. I imagine that these would also help protect the frame of the Jeep from a low speed incident in something like a parking lot.
Purchasing the Bumper:
I bought this bumper from 4wheelparts, as almost a spontaneous buy, since I noticed it on their website at 10%. I ordered it over the phone with their Langley store and it took approximately 2 weeks to arrive.
Once it came in I made the 4 hour drive each way to go pick it up. This was still much cheaper then paying freight. On this trip it was a good thing I was alone as the box stretched from the back tailgate, across the folded down rear seats and up against the back of the fully forward front seat. It was also up against the drivers seat and the far side of the Jeep, meaning 5 and 6th were awkward to shift to or between. In fact should the box had been even 1 inch longer I do not think it could have been put into the jeep as is.
Unboxing:
When I got home I immediately went to unboxing of the bumper with help from my girlfriend. Inside the heavy duty box were 2 smaller boxes of components and the bumper which itself was wrapped in foam wrapping, then additional light cardboard layers, then a heavy duty plastic wrapping. Needless to say the bumper came out in the same condition it left the factory. Below is a picture of all of what is in the box. I liked that ARB supplied a very nice harness for the turn signals, as well as additional brackets and hardware for the different combinations of suggested auxiliary lighting.

I chose to go with the semigloss black powder coated finish (ARB3450240) since I think it has the iconic ARB look, however based on the pictures online of the textured finish it goes really well with the other JK plastic components. Having the semigloss finish also allows me to have the bumper painted, something I was tempted to have done to make it more unique. I have since decided against that at this time, but will perhaps reconsider when the bumper starts showing its age.
Closeups of Bumper Construction:
 |  |
  |
 |  |
 |  |
 |  |
Notice how well the recovery points are secured and tips of the wings are folded and welded at multiple points as opposed to just being butted up and welded on the seam. You can also see a slotted hole near the recovery point, this ties into the frame crossmember which I think helps triangulate the bumper so its not all mounted in a single plain, yet since it mounts back into the crumple zone I believe this slot would allow for the bolt to move in an accident. A very well engineered design. I followed the torque specs very carefully then installing this bolt.

The image above shows the double up on material for the winch mount.
 |  |
The directions that are provided are acceptable, and should definitely be referenced, I found that a few of the fasteners may have had mislabeled coating descriptors (ie. galvanized, vs black etc.).
Since everything is for the most part all in one big bag I also had a ruler handy to measure the lengths of fasteners, mainly though the assembly is just common sense.
1. The first step is to pull off the stock bumper, this is held on by 8 bolts, even though my jeep is 9 years old and almost 200k km, there was no issue removing these by hand. I pulled off the grill too to get to my light bar connector, as well as to allow easier access to the wiring. Don't forget to disconnect the fog lights as well.
There is a plastic panel that was a bit of a pain to remove between the grill and the bumper, I found it best to try cut the plastic fasteners with a utility knife on the top of the frame.

Noticed I parked on the flattened box the bumper came in, this offered some insulation and a cleaner surface than the concrete floor.
2. The next step is to remove the fog lights from the bumper and pull the plastic cover off the stock bumper by removing the 4 bolts. An impact made short work of this. This step is required since you will be cutting the crush cans out of the stock bumper. Once this was complete I rounded the edges and gave them a couple coats of black paint. I left them to dry overnight.

3. Next I took the removed fog lights and spent some time wet sanding them, then polishing them to try make them look as good as possible. I then mounted them into the frames that will be bolted into the bumper (no pictures). The screws used to secure the lights into the brackets are quite long and this was the only time in the install I questioned why a particular fastener was chosen. This step is also not well outlined in the directions as to the orientation of the lights into the brackets, make sure you lay out the right and left bracket into the bumper (they only go in one way), then ensure the housings are installed with the vent to the top and lettering in the lens upright.
I then mounted the brackets into the bumper, here it helps to have small fingers as its quite tough to get the nuts and bolts into position. I took my time at this step making adjustments to ensure the fog lights were centered in the bumper openings.
I also installed the plastic crush can cover around this time as well.
4. Since I do plan on eventually running a winch the directions state to cut small sections out of the front bumper mounts, the directions are sufficient here, and I made the cuts very carefully using the cut off wheel on an angle grinder. I then cleaned it all up with a file.
 |  |
 |  |

Once the cuts have been cleaned up with a file a shot of black semigloss spray paint was added to give everything a fresh look and some protection to the bare metal.
5. The next day after allowing the painted crush cans to dry I installed the crush can extensions. I feel like the notch in the end should be aligned with the bottom side of the can to allow for any water drainage. I could be over thinking it too, as this may have only been used to hang the parts during the paint or powder coating. If you want to do what I did and install these facing the bottom ensure that you check the orientation of the cans in the bumper as they will only work in one orientation.

6. I choose my next step to be the lengthening of the wiring harnesses. While wire is supplied I did not like that is seemed to be a smaller gauge and all red, I had another wiring harness in my electronic collection so I pulled a section of white and black from it to more closely resemble the factory wiring. Notice how I did staggered cuts to ensure that I could fit loom back over the wires for protection. Once I soldered to the Jeep side I slid 2 layers of shrink tube over, as well as another 2 layers for after I connected the plugs.
 |  |
These were some of my nicest solder joints and I couldn't help but think perhaps its due to better quality wires than I am used to using?
7. Once you have this wiring extended you are pretty much ready to bolt on the bumper. You could (and probably should) also wire up the signal lights but I was too eager to get the bumper mounted up. There is no harm in doing so other than a slightly restricted work space and the possibility to scratch or mar the bumper.
Before mounting the bumper the directions suggest using silicon to hold the crush cans into place, since I didn't have silicone I applied a small amount of 'Right Stuff' gasket maker, and clamped them in place for a few minutes.
With the help of my girlfriend we then lifted the bumper onto the frame and started threading the bolts, I suggest starting with the holes that are not slotted. Some of the bolts were a little difficult to get in due to the powder coating in the treads but this wasn't a huge deal. I used Loctite on all the fasteners.
8. By this time I was in a hurry to button up the project so there are less pictures than there should be. This step is where the bumper is bolted back into another location on the frame. For this purpose the directions are quite good and there are a couple tools included that hold a captured nut in place while it is threaded, on my jeep however the frame prevented to tool from going in place and I had to use a stubby wrench (11/16th if I recall correctly) to hold the nut. If that was the first one I attempted to fasten I would have used this method on both sides as it actually proved easier then using the tool. If you have a 2010 onwards (according to the instructions) you will have to drill this hole.
Once this fastener was in place I snugged each side up, then torqued to spec. I then went to the other 8 fasteners and torqued them down as well.
9. My next step was to install the turn signal light harness, the harness connects to your battery and frame, then runs down the length of the engine bay to the airbox (for a LHD), down to the existing harness and taps into the wire furthest away from the black ground. Like the fog lights I did not use the supplied wiring connectors, instead I carefully stripped back the wires and soldered in the harness.
I then ran each sides of the harness an cleanly as I could to each side of the bumper securing it well with cable ties to the existing harness. For the drives side I ran it up and over the radiator support.
Since my battery area is getting messy with wiring (a project for another day) I took to two relays for this harness and zap strapped them into the airbox intake through a couple small holes I drilled.
The lights themselves come apart and small black expanding clips are inserted into each end of the grey housings, there is also a weather seal that needs to be inserted. The lights can then be gently pressed into the bumper. I used a phillips screwdriver in each of these clips to help apply enough force to pop them into place. The lenses can then be installed, but be careful not to screw down the lens too tight as it would be at risk of cracking.
10. Basically the final step of the bumper install is to install some braces into the bumpers wings. However I couldn't stand the thought of these and the insides of the bumper being pelted with rocks, dust, and packed with snow. I know the bumper warns against modification but I did not feel this would impact the safety features in anyway.
What I did was start by making templates using cardboard cutout to the shape of the backside of the bumper facing the wheel well. I picked up a regular Rubbermade black plastic garbage pail from Walmart big enough for these pieces. See below image of garbage pail the plastic was cut from, the plastic insert (rough cut), and the template.

 | Here you can see how this brace is intended to fit. |
| And here you can see how the guard will sit. I feel this gives it a more polished look and I hope it helps to protect the backside of the bumper. |  |
All in all I feel it took me about 8-10 hours to install, I was by no means in a rush. I took my time to do the wiring right, as well as try restore the fog lights, and made adjustments to have the lights centered perfectly. I'm really happy with the fit and finish and how well everything went together, I guess you get what you pay for as there are many much cheaper bumpers.
Sunday 2 October 2016
Jeep Cargo Shelf
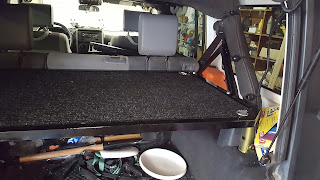
Each time I take the Jeep out on a trip requiring me to pack a fair amount of gear I feel myself desire improvement to the organization and storage solutions. I think this is one of the aspects of constant improvement any Jeeper or overlander will strive for. Its not that I found myself not being able to carry very much, instead its how do I stay organized throughout the duration of the trip as the Jeep is packed an unpacked repeatedly.
A partial answer to this for me was for the addition of a shelf in the rear of the Jeeps cargo area. The main reason for this is so that I can have a cooler always accessible, with nothing (or very little) stacked on it preventing its removal. Also splitting up the rear in this way would allow me to keep my camera gear, clothing, and other lighter weight stuff within easy reach and out of harms way. I also frequently pack firewood and other messy things in my Jeep so this helps keep things clean.
Designing the concept in my head I had some pretty lofty expectations. I wanted it to be:
 The rack mounts similar to others on the market, where it utilizes the same bolt holes as the softtop. It was then quite a chore to measure and mock up how the remainder should look. My final solution was somewhat of an 'L' with one bar running parallel to the sport bar, and another running perpendicular. At the end of each of these arms was simply a welded piece of Angle iron that the base of the rack would lay on and which a 1/4-20 bolt would run through.
A partial answer to this for me was for the addition of a shelf in the rear of the Jeeps cargo area. The main reason for this is so that I can have a cooler always accessible, with nothing (or very little) stacked on it preventing its removal. Also splitting up the rear in this way would allow me to keep my camera gear, clothing, and other lighter weight stuff within easy reach and out of harms way. I also frequently pack firewood and other messy things in my Jeep so this helps keep things clean.
Designing the concept in my head I had some pretty lofty expectations. I wanted it to be:
- Height adjustable
- Safe
- Pivot out of the way for easy access to the back
- Sturdy for rattle free operation
- Light weight
I spent many evenings designing the shelf in my head before starting to build. During this time I struggled to find way of accomplishing what I wanted without adding exponentially more complexity. In the end I decided that to build a basic shelf would be far less work that building one that could meet all my original expectations. I figured that it would be best to start simple, use it, and then take my time to incorporate any enhancements that I found I need in a future version.
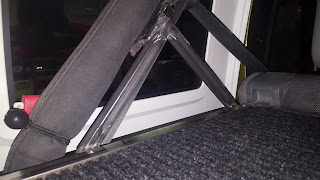
I started off by building a frame that would hold a piece of carpeted plywood. The fixed height this one would be built to would roughly line up with the seam across the back of the rear seats. I built it as wide as I could leaving about 1 inch on either side between the sport bars to accommodate my bracketry. I quickly tacked together this piece in one evening but would have it sit like this for about a month as I procrastinated designing the mounts.

 The rack mounts similar to others on the market, where it utilizes the same bolt holes as the softtop. It was then quite a chore to measure and mock up how the remainder should look. My final solution was somewhat of an 'L' with one bar running parallel to the sport bar, and another running perpendicular. At the end of each of these arms was simply a welded piece of Angle iron that the base of the rack would lay on and which a 1/4-20 bolt would run through.
As it was all finally coming together I added some gusset, and tabs to the base to allow me to bolt some D rings through. I felt like these features would give me a fighting chance at a safe solution in the event of an accident.
Once it was all complete and assembled another post online about above head storage in the back seat inspired me to go in search of cargo netting that fit quite nicely and will also help secure gear (Not pictured).

So far I have been very happy with the rack, it has been practical and rattle free.


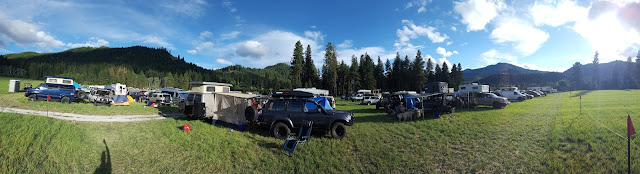
Northwest Overland Rally 2016
Earlier this year, at the end of June, I attended my second Northwest Overland Rally in Plain Washington.
The first time I attended this event back in 2014, despite having a crummy first night (due to not knowing anyone, cutting myself on a beer bottle, and finally turning in for an early night only to have the neighbor adjacent pumping music into the early hours of the morning) I ended up having a great time, met a few cool new people, and got inspired to improve my setup. It was this event that inspired me to build the trailer as well as was this event last year that I aimed to have the trailer done by, although in the end I didn't end up going.
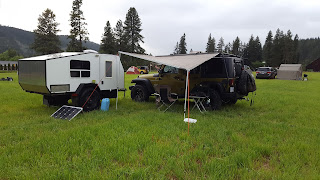 This years event was quite different. First off I rolled in quite confidently, with my Jeep and trailer which now more closely resembled something that would be considered "overlanding". I swear, and I am not joking, the last time I was there I was the only person in a 4x4 vehicle that was sleeping in a regular dome tent. I felt out of place amongst the sea of roof top tents, wall tents, pop-up campers, and extreme motorhomes. Actually in contrast this year it was not uncommon to see people in run of the mill tent trailers, trailers, and tents. If I'm honest I didn't mind that it diverged from the more hard core to the more affordable setups since it still is a great group of people with common interests.
Another major difference this year was the size, in 2014, there were two parallel events being run out of the same farmers field, one was the Touratech Rally for adventure touring motorbikes, and the other being the Northwest Overland Rally (NWOR). This year the field we were using previously was completely taken over with bikes and the Overland Rally was in a field adjacent. I don't have the greatest memory, but I want to guess there was maybe double or more the number of vehicles as part of the rally this year? This made me extremely curious as to what the event last year looked like that seemed so highly rated by the attendees on forums I frequent.
 Here is a great youtube video created by Oregon Trail Off-Road that shows you the scale of the event, my setup can be seen at 0:15: Video
Another benefit to the layout this year was that there was a more purposeful and permanent off road course, as well as the ability to host other education sessions in the shade of a section of forest.
The dynamic of this years event was quite different for me, I wasn't unprepared as a I was last time but I also didn't feel as social and didn't immediately recognize anyone I knew when I got there. This meant for me, each night after the campfire, I went back to my site and just hung out, whether it was reading a magazine, watching a movie or just going to sleep. In 2014 since I was thrown in with a tight knit group of people I just asked to join their campfire and listened to them tell stories for hours. Of coarse I could see there was the odd group with a campfire this year but I didn't feel the urge to invite myself over.
Some of the aspects of this years event were similar, there were still great people, great vendors and great prizes.
The People
As always the people at this event are nothing but great I had several great conversations with people around the event. It is easy to strike up conversation when there is so much to talk about such as unique setups or asking for candid review of maybe a product you had been eyeing up and looking to purchase. It seems like every one is happy to show off their setups or come and chat about yours.
 I also had particularly interesting conversations at the technical course talking to the Land Rover instructors and they pushed the new Ranger Rover diesel harder than 99.9% of the people that will end up buying them. It was also interesting to learn from these guys how they were guiding people through the course with their own cars. Its funny to note that at one point I swore that this location was the congregating point of Canadians as both instructors, the rally organizer, and a few others from here in BC were all discussing the vehicles going through.
The Vendors
While I missed not having some vendors at this years event such as Mountain Khaki who I got some clothes and a canvas bag from last time, or AEV who I got to drool over their Hemi and Brute conversions, there were still as number of interesting vendors in attendance.
 The most notable venders in my mind were VMI Offroad, who had a line of really cool, all welded aluminum off road trailers. These included both cargo and camping. The next was Jeep Kitchen a Vancouver BC based business that has a very nice very nicely designed kitchen system designed for the back of a Jeep JK Unlimited. It is high quality with amazing fit and finish, including details to ensure it is completely rattle free. There were other iconic off road brands such as ARB, and Warn. The Warn rep was also the one hosting winching seminars that were very informative. I also had a great conversation with the guys at Nitro gears asking for their advice on my eventual Jeep re-gear. Also Kargo Master, the company that builds my rack were there so I got to see and chat with them about the new line they have, as well as tried to sneak in a few of the 'improvements/modifications I had made to the older (now basic) model. I tried to be good this year and not buy too much stuff but when I saw that they had a RAM mount dealer I knew I had to pull the trigger on an aluminum long arm (ok, I know it only about $20 but I love this system as you can see in my previous posts!).
The Prizes
I remember my first night of 2014 around the camp fire, someone leaned over to tell me that they give away some good prizes, and on the last night they even give a way a complete set of tires! This year lived up to that same expectation, while I didn't personally walk away with anything it seemed like I was the minority. They gave away at least 3 or 4 winches, the set of tires, some really cool portable firepits, rc cars, tons of offroad accessories, and finally piles of swag. Next year I'll win something, or thats what I will keep telling myself.
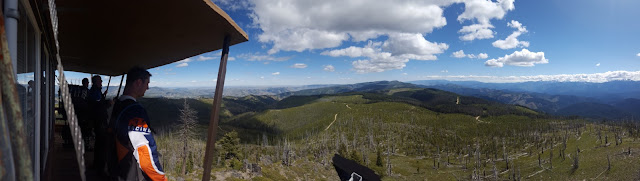
Another part of the event that I really like and highly suggest you take advantage of is one of the trail rides. This year they were lead my members of Northwest Overland, a forum with a similar name but no official connection to the rally. The tame trail run which I have done both years, is about a 3-4 hour round trip that takes you up to a fire lookout which by definition has amazing views of the area. I felt sorry for some of the people with roof top tents, awnings and other stuff strapped to their trucks who were not ambitious enough to break camp to go explore.


 That brings me to a little word of wisdom, and I don't mean it to be a way of telling you how to run your life. But if you are just thinking of getting into camping or overlanding and are starting out with no gear keep in mind what you want out of it, do you want to be able to go some place cool and setup a base camp but still have easy access to your vehicle, or do you want to be on the road each day camping at different spots each night. This should seriously be a main consideration for your setup. For me a trailer made the most sense since most of the time I go to a single location to camp and explore around. In a perfect world I would have a roof top tent (RTT) as well but for now this covers off most scenarios.
All in all this is an event I would highly recommend, I can't wait to make it back next year and see how it has evolved yet again. My tips for anyone going are be prepared for any weather. Its fairly high in the mountains so while the days are warm the nights can get quite cool. Also like this year it rained for a few hours quite heavily I didn't bring waterproof shoes so I had a tough time getting everything to dry out once it finally cleared. Last year the report was that it was unseasonably warm and that seemed to be the biggest complaint, so just plan for everything. Since you are camping in a farmers field I also recommend a good inflatable mattress if you will be sleeping on the ground as it quite lumpy.
I'll leave you with a few more pictures. Hope to see you at the event in the future!


The first time I attended this event back in 2014, despite having a crummy first night (due to not knowing anyone, cutting myself on a beer bottle, and finally turning in for an early night only to have the neighbor adjacent pumping music into the early hours of the morning) I ended up having a great time, met a few cool new people, and got inspired to improve my setup. It was this event that inspired me to build the trailer as well as was this event last year that I aimed to have the trailer done by, although in the end I didn't end up going.
 This years event was quite different. First off I rolled in quite confidently, with my Jeep and trailer which now more closely resembled something that would be considered "overlanding". I swear, and I am not joking, the last time I was there I was the only person in a 4x4 vehicle that was sleeping in a regular dome tent. I felt out of place amongst the sea of roof top tents, wall tents, pop-up campers, and extreme motorhomes. Actually in contrast this year it was not uncommon to see people in run of the mill tent trailers, trailers, and tents. If I'm honest I didn't mind that it diverged from the more hard core to the more affordable setups since it still is a great group of people with common interests.
Another major difference this year was the size, in 2014, there were two parallel events being run out of the same farmers field, one was the Touratech Rally for adventure touring motorbikes, and the other being the Northwest Overland Rally (NWOR). This year the field we were using previously was completely taken over with bikes and the Overland Rally was in a field adjacent. I don't have the greatest memory, but I want to guess there was maybe double or more the number of vehicles as part of the rally this year? This made me extremely curious as to what the event last year looked like that seemed so highly rated by the attendees on forums I frequent.


Another benefit to the layout this year was that there was a more purposeful and permanent off road course, as well as the ability to host other education sessions in the shade of a section of forest.
The dynamic of this years event was quite different for me, I wasn't unprepared as a I was last time but I also didn't feel as social and didn't immediately recognize anyone I knew when I got there. This meant for me, each night after the campfire, I went back to my site and just hung out, whether it was reading a magazine, watching a movie or just going to sleep. In 2014 since I was thrown in with a tight knit group of people I just asked to join their campfire and listened to them tell stories for hours. Of coarse I could see there was the odd group with a campfire this year but I didn't feel the urge to invite myself over.
Some of the aspects of this years event were similar, there were still great people, great vendors and great prizes.
The People
As always the people at this event are nothing but great I had several great conversations with people around the event. It is easy to strike up conversation when there is so much to talk about such as unique setups or asking for candid review of maybe a product you had been eyeing up and looking to purchase. It seems like every one is happy to show off their setups or come and chat about yours.

The Vendors
While I missed not having some vendors at this years event such as Mountain Khaki who I got some clothes and a canvas bag from last time, or AEV who I got to drool over their Hemi and Brute conversions, there were still as number of interesting vendors in attendance.

The Prizes
I remember my first night of 2014 around the camp fire, someone leaned over to tell me that they give away some good prizes, and on the last night they even give a way a complete set of tires! This year lived up to that same expectation, while I didn't personally walk away with anything it seemed like I was the minority. They gave away at least 3 or 4 winches, the set of tires, some really cool portable firepits, rc cars, tons of offroad accessories, and finally piles of swag. Next year I'll win something, or thats what I will keep telling myself.


All in all this is an event I would highly recommend, I can't wait to make it back next year and see how it has evolved yet again. My tips for anyone going are be prepared for any weather. Its fairly high in the mountains so while the days are warm the nights can get quite cool. Also like this year it rained for a few hours quite heavily I didn't bring waterproof shoes so I had a tough time getting everything to dry out once it finally cleared. Last year the report was that it was unseasonably warm and that seemed to be the biggest complaint, so just plan for everything. Since you are camping in a farmers field I also recommend a good inflatable mattress if you will be sleeping on the ground as it quite lumpy.
I'll leave you with a few more pictures. Hope to see you at the event in the future!


Friday 13 May 2016
Daystar Upper Dash Panel
Maybe I have used 'best modification' elsewhere, I am not sure. I do have to clarify that the one I am about to show you probably does take the cake....
I mention this already in my build log. But its to do with the upper dash panel. The stock Jeep one is just a pice of smooth plastic, which prevents the storage of small items up there. While I thought this may have been done for passenger safety (TJ had this functionality) it also returned with the JK dash redesign in 2011.
To remedy this in the earlier Jeeps I highly recommend the Daystar dash panel, the replacement panel simply adds some places to store small items. It has also proven to also be a great base for further modifications and tweaks. To date I have modified it in 4 unique ways.
The first thing I have done with mine was to spray it with plasti-dip (or similar product) this I feel adds a slightly grippier texture to prevent your items sliding.
The second thing I have done was add some "RAM" mounts to both sides. This system of balls, arms, and holders etc works phenomenally and is extremely well built. The downside is the price, I probably have over $100 of components on mine. Its nice to think that is modular and the arms and device holders can be easily transferred to another vehicle. Another upside is I can quickly switch between two phone mounts and replace one with a go pro etc. In the future I also plan to have a small tablet, I will then only need the new cradle or "X-mount" and I can swap it into the mix in seconds. My most common use is my phone closest to me and my old iPhone running MotionX GPS on the second.
The third modification was to add some angle aluminum and a fin to the back. I did this to help direct more defrost air in front of the driver. I am really disappointed that Jeep would have designed this air to come out the centre in a fan pattern. Several times each winter I will be driving in cold enough temperatures where the corners fog up and/or ice builds up when snow from the centre melts and refreezes on the edges. Unfortunately I cannot honestly say that I notice this modification has done anything to help this I will keep tweaking it trying to make it better.
The last change I made is stealthier than some of the others. I have drilled two small holes for LEDS in either corner. I wanted to work on adding red LED interior lighting for when the passenger needs to find something or view a map while driving. This is currently the first and only place I have installed these I do have some LED strip lights that I will be mounting under the dash as well as under the different tiers of the centre stack.
 As it is installed in the Jeep.
 Unclipped and spun so you can see the backside modification detail. Although it just uses the stock clips it mounts very securely and is rattle free. A quick twist of the on knob on the arm allows for adjustability in all directions, tightening this prevents any movement regardless of how rough the road.
 Another view from the back. Here you can clearly see the second set of holes for my previous iteration which used a different ball configuration. This latest one has two mounts originally designed to be used on a motorcycle brake or clutch master cylinder.
My future modifications may be as simple as adding a couple holes in either side to loop some black zap straps through this way I can route wires to my devices keeping it out of the drivers way.
I mention this already in my build log. But its to do with the upper dash panel. The stock Jeep one is just a pice of smooth plastic, which prevents the storage of small items up there. While I thought this may have been done for passenger safety (TJ had this functionality) it also returned with the JK dash redesign in 2011.
To remedy this in the earlier Jeeps I highly recommend the Daystar dash panel, the replacement panel simply adds some places to store small items. It has also proven to also be a great base for further modifications and tweaks. To date I have modified it in 4 unique ways.
The first thing I have done with mine was to spray it with plasti-dip (or similar product) this I feel adds a slightly grippier texture to prevent your items sliding.
The second thing I have done was add some "RAM" mounts to both sides. This system of balls, arms, and holders etc works phenomenally and is extremely well built. The downside is the price, I probably have over $100 of components on mine. Its nice to think that is modular and the arms and device holders can be easily transferred to another vehicle. Another upside is I can quickly switch between two phone mounts and replace one with a go pro etc. In the future I also plan to have a small tablet, I will then only need the new cradle or "X-mount" and I can swap it into the mix in seconds. My most common use is my phone closest to me and my old iPhone running MotionX GPS on the second.
The third modification was to add some angle aluminum and a fin to the back. I did this to help direct more defrost air in front of the driver. I am really disappointed that Jeep would have designed this air to come out the centre in a fan pattern. Several times each winter I will be driving in cold enough temperatures where the corners fog up and/or ice builds up when snow from the centre melts and refreezes on the edges. Unfortunately I cannot honestly say that I notice this modification has done anything to help this I will keep tweaking it trying to make it better.
The last change I made is stealthier than some of the others. I have drilled two small holes for LEDS in either corner. I wanted to work on adding red LED interior lighting for when the passenger needs to find something or view a map while driving. This is currently the first and only place I have installed these I do have some LED strip lights that I will be mounting under the dash as well as under the different tiers of the centre stack.


My future modifications may be as simple as adding a couple holes in either side to loop some black zap straps through this way I can route wires to my devices keeping it out of the drivers way.
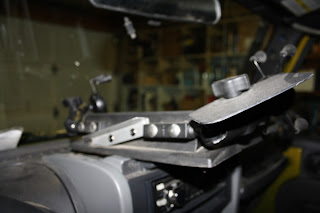
Jeep Tailgate Table Fabrication
As the weather has been improving I have found myself working outside in the shop more and more. Part of this time is spent fabricating new things for either the Jeep or trailer. I find this a great way to destress after a days work, as well as it acts as an outlet for creativity.
The last few weeks one of the projects I have had in the back of my mind has been a Jeep tailgate table. Now I did a lot of looking and you can purchase one for somewhat reasonable prices (<$200), however I wanted the challenge to build my own, while also building it exactly to what I envisioned.
Another thing I had going for me was some left over aluminum from the trailer build, the main surface of the table would come from this. What I ended up having to buy was a few lengths of aluminum angle, some cable, crimps, and a latch. All the remaining parts I already had. While I bought more of the supplies that I needed I figure the actual costs that went into the table are right around $40.
I should mention that a table on the tailgate is never something I found myself needing it has always been one of those overland-esque type items I have always wanted.
I'm not going to get too much into the details of the builds, and instead hope the pictures below can speak for themselves.
 Picture of the near finished table with no latch

 The table closed, again without a latch. Note how much space I maximized since I had no need to clear a subwoofer.
 The stainless latch which I picked up at out new Lee Valley store. When closed and secured it is very secure and I am confident will be rattle free.
The last few weeks one of the projects I have had in the back of my mind has been a Jeep tailgate table. Now I did a lot of looking and you can purchase one for somewhat reasonable prices (<$200), however I wanted the challenge to build my own, while also building it exactly to what I envisioned.
Another thing I had going for me was some left over aluminum from the trailer build, the main surface of the table would come from this. What I ended up having to buy was a few lengths of aluminum angle, some cable, crimps, and a latch. All the remaining parts I already had. While I bought more of the supplies that I needed I figure the actual costs that went into the table are right around $40.
I should mention that a table on the tailgate is never something I found myself needing it has always been one of those overland-esque type items I have always wanted.
I'm not going to get too much into the details of the builds, and instead hope the pictures below can speak for themselves.


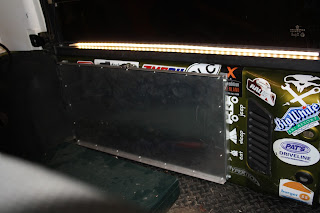
Tailgate closed on the Jeep. Check out the LED strip lighting I ran on the back glass. This helps so much to see whats in the back at night and will provide perfect light over the table.
Future improvements may include something to get use out of the 1 inch or so space between the table and tailgate, perhaps some cutlery/utensil storage. I may also search for cutting board to modify which I can then fabricate to slide out from under the table once lowered.
Overall I am very happy with how this came out and hope to find some use for it.
Subscribe to:
Posts (Atom)